4. Automate the contract and verification results exchange
Now you have two different sets of tests in two different codebases. The artifacts that tie these tests together are the Pact file, and the verification results. The next step is to automate the exchange of these artifacts.
The Pact Broker is a service that allows your projects to exchange pacts and verification results in an automated way.
While you can use Pact without a Pact Broker, using one allows you to get the most out of Pact. Without the Broker, you will have to work out how to create your own feedback loop that lets you know the results of the pact verifications, and your pacts will not enable to you release your services independently and safely using the can-i-deploy tool (more on this later).
Quick Start
The Pact Broker is an open source tool that requires you to deploy, administer and host it yourself. If you would prefer a plug-and-play option, we've created Pactflow, a fully managed Pact Broker with additional features to simplify teams getting started and scaling with Pact.
Get started for free on our Developer Plan here.
Verifying pacts
There are two reasons that a verification task will need to be run:
- When the provider code changes
- The verification task will run as part of the normal CI/CD pipeline for the provider
- The verification task will fetch and verify all the relevant pacts from all consumers from the Pact Broker to ensure no regressions have occurred.
- When the pact changes
- We recommend that a separate pipeline is set up to verify just the changed pact (more details on this below).
Consumer pipeline
The following diagram shows what a fully fledged Pact supported release pipeline might look like for a consumer. During this step of the set up guide, we are just going to cover publishing the pact, and configuring the webhook. The other parts of this pipeline will be covered in later steps.

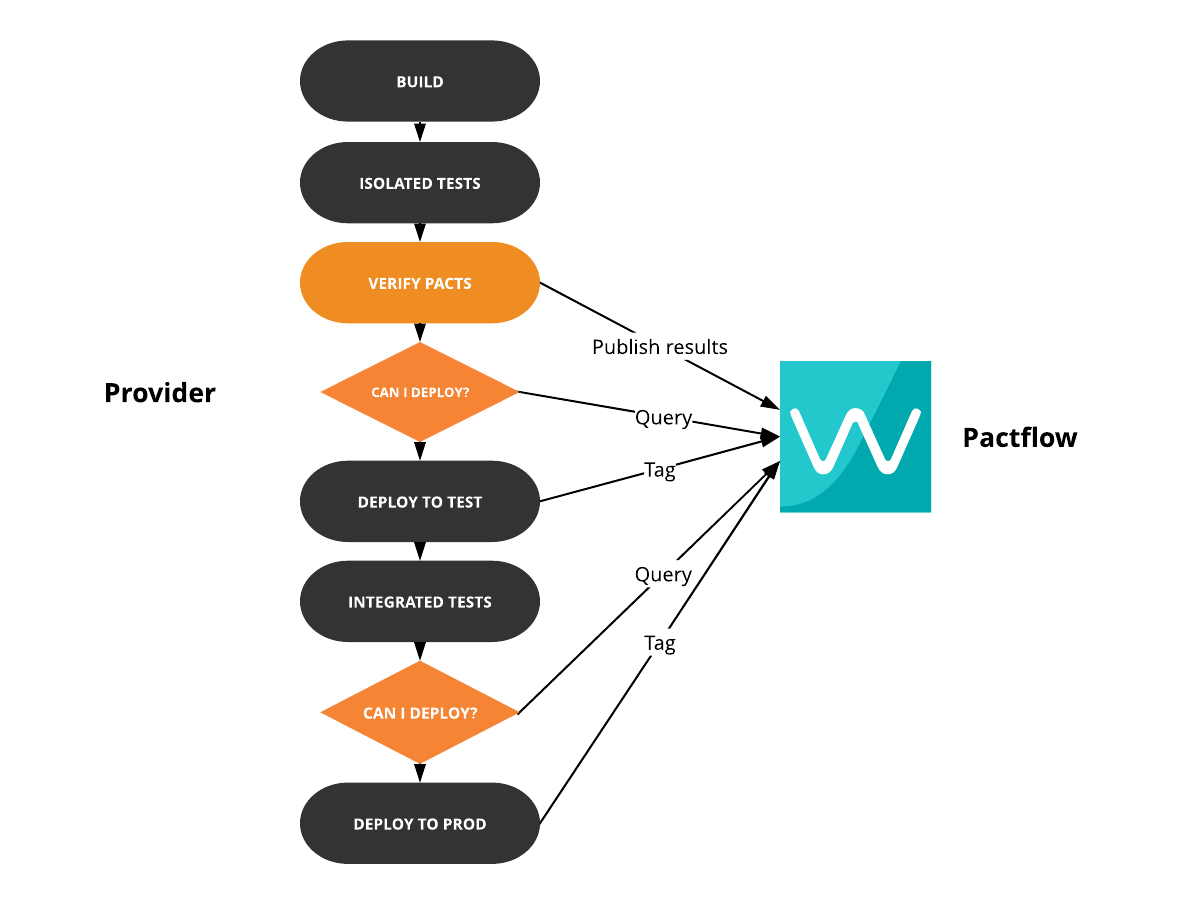
Provider pipeline
The following diagram shows what a fully fledged Pact supported release pipeline might look like for a provider. During this step of the set up guide, we are just going to cover the pact verification and results publication. The other parts of this pipeline will be covered in later steps.
A. Set up a Pact Broker
- Read the Pact Broker home page, (taking note of the various deployment options available to you in the Usage section), or sign up to a hosted Developer plan at Pactflow.
- Deploy a Pact Broker to a network that has access to both consumer and provider CI systems so it can trigger builds.
B. Do the CI/CD workshop
Before setting up Pact in your own environment, it can help to have an idea of what a working pipeline might look like. Completing the Pact CI/CD workshop will give you a good understanding of how the Pact client libaries interact with the Pact Broker and where these interactions fit into your release pipeline.
Note that if you are using your own instance of the open source Pact Broker, it does not support secrets, and it does not have a user interface for managing webhooks. You'll need to use the API to create the webhook, and your Travis CI token will have to be stored in plain text in the webhook.
C. Configure pact publication
- Configure your consumer build to run the Pact tests and publish its pact to the Broker as part of its main build (consult the documentation for your chosen language). Consumer Pact tests typically run after the unit tests, and before deploying to a test environment.
D. Configure pact to be verified when provider changes
- Configure your provider build to fetch the pact(s) from the broker and publish the verification results as part of its main build (consult the documentation for your chosen language). This would typically happen after the unit tests, and before deploying to a test environment. You can find the recommended configuration here.
E. Configure pact to be verified when contract changes
- Create a new CI job that performs just the provider pact verification step for a given pact URL. Consult the documentation for your chosen language for the syntax of how to configure this - you can find an example here. The job should accept the URL of the changed pact in the HTTP request parameters or body. You can find a library of webhooks that trigger a build in many popular CI systems here, otherwise you'll need to consult the documentation for your CI application to learn how to pass in parameters to a build. Note that this build will fail when a consumer pushes an unsupported change to a contract - that is expected and fine. There should be no downstream dependencies on this build. Its only job is to run the verification for the changed pact and report the results back to the broker.
- Configure a webhook to kick off the provider verification build when a pact changes, and use webhook templates to pass the URL of the changed pact to the build.
If you can't use webhooks to trigger a build for technical or policy reasons, see below for a "webhookless" workflow.
As you have two different builds running the pact verifications (one when the provider changes, one when the contract changes) it is best to use a provider version number that is deterministic (eg. does not include your CI build number) so that a verification from either job is recorded with the same version number. The recommended approach is to use the git sha (or equivalent for your version control system) wherever possible. This will help you when it comes to using the can-i-deploy tool in step 7. Please read the section on versioning in the Pact Broker to ensure your version numbers will help you get the most out of your Pact Broker.
Useful links:
- Installing a Docker Pact Broker
- Publishing verification results
- Configuring webhooks in the Pact Broker
- Adding verification badges to your READMEs
- Versioning in the Pact Broker
Alternative "webhookless" workflow
If you can't use webhooks because of networking issues, then you can see an example of an alternative consumer pipeline design in this example repository.